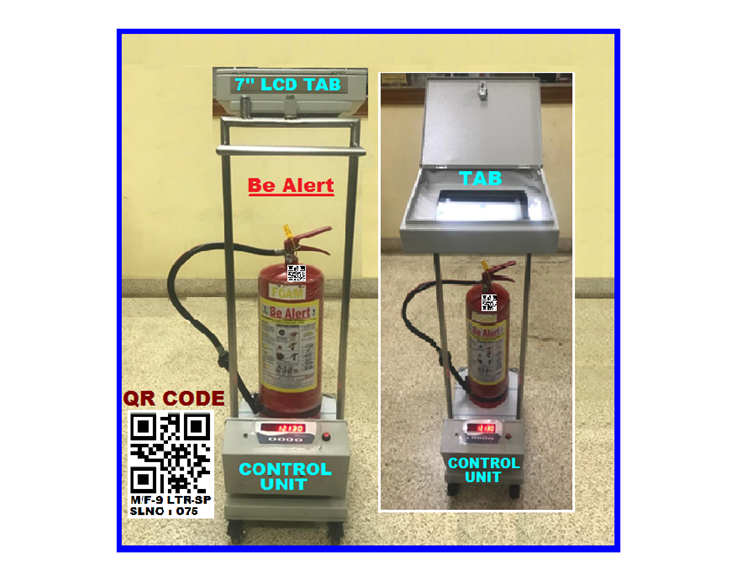
PORTABLE (MOBILE) TYPE FIRE EXTINGUISHER
SERVICING SOFTWARE WITH TROLLEY MOUNTED.
NEW TECHNOLOGY AND GOOD FEATURES
PORTABLE (MOBILE) TYPE FIRE EXTINGUISHER
SERVICING SOFTWARE WITH TROLLEY MOUNTED.
Details of Full Technical Specification :
1. All the Portable type Fire Extinguishers will be provided with QR Code Sticker along with the software.
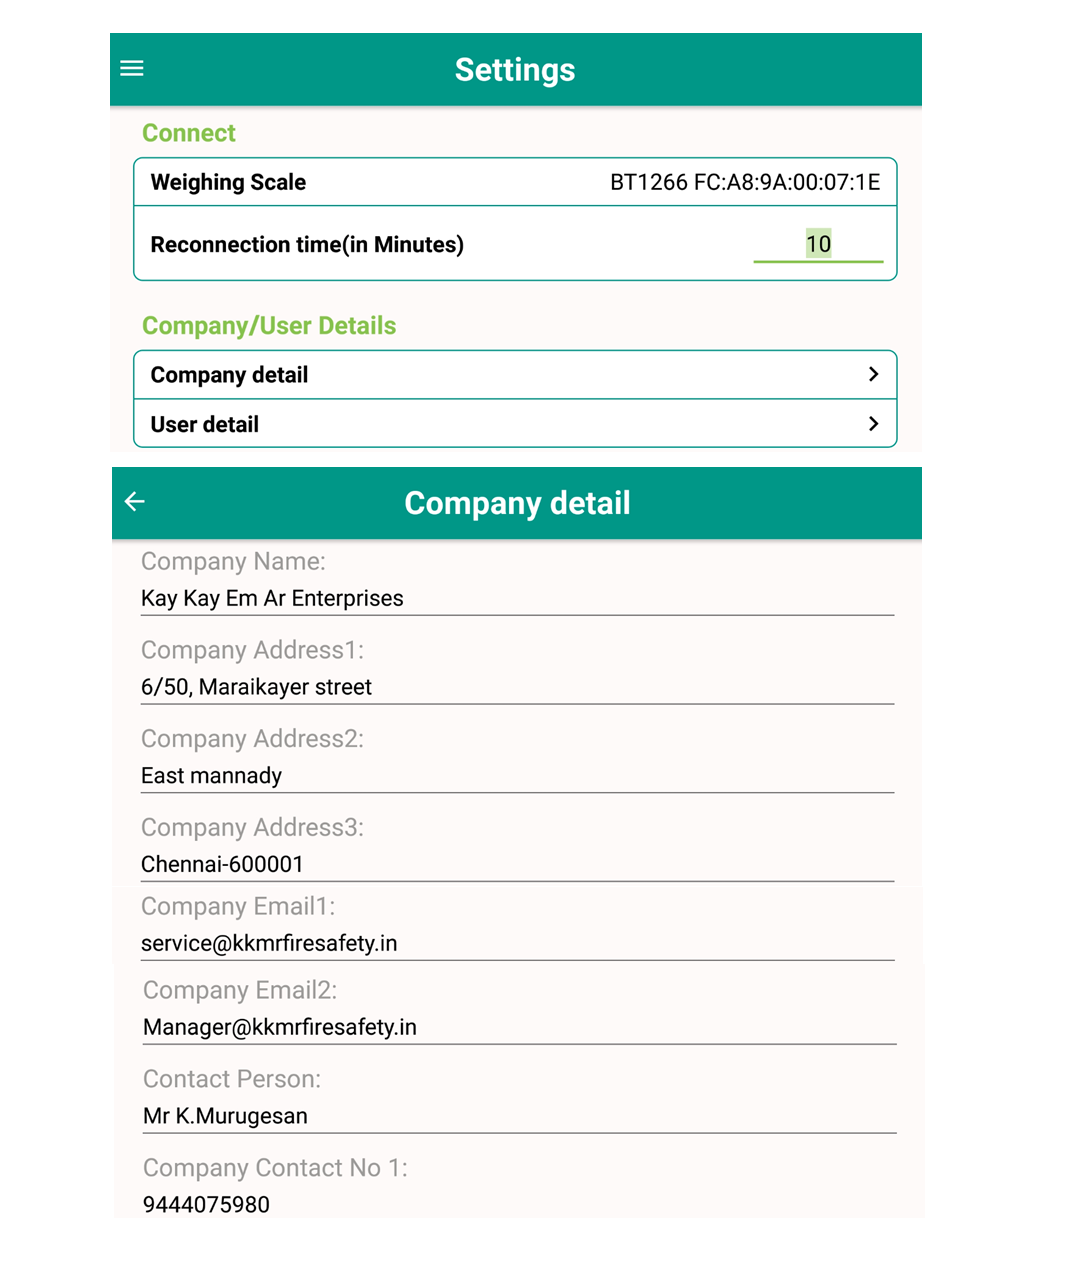
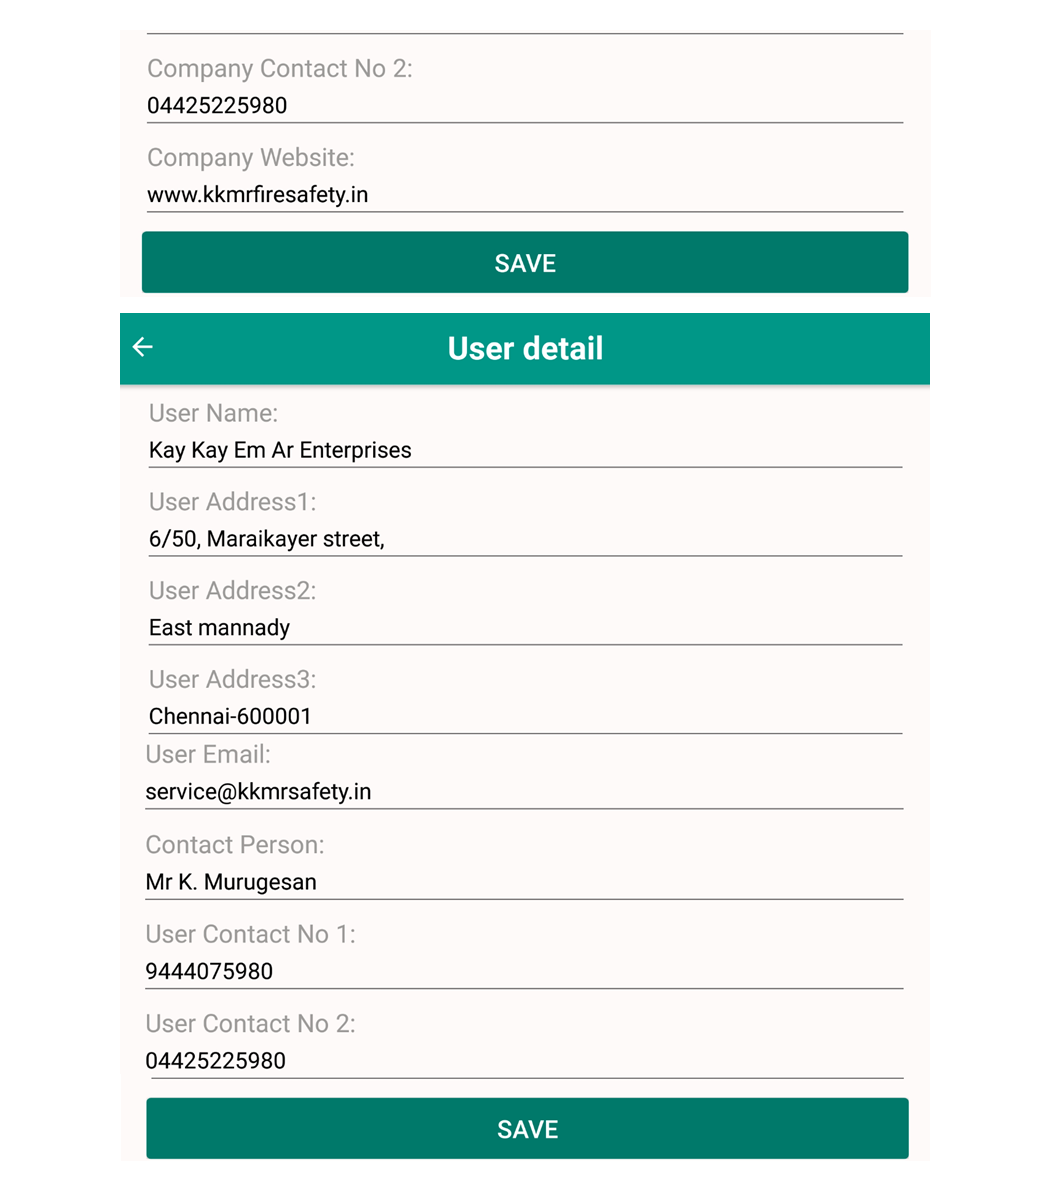
2. 7" Touch screen Tab loaded with Fire Extinguisher Servicing Software
3. The software Tab unit will automatically scan QR code Sticker provided on the Fire Extinguisher.
4. The Time spend by the servicer is shown from the time of start to end along with the Number of Cylinder Serviced will be shown
5. The Unit is provided with 300 kg cap. Load cell for weighing Portable type Fire Extinguishers.
6. Service Reports generation can be programmed on Daily, Weekly, Monthly, Quarterly and yearly as per the Requirement
7. The Service report will be automatically generated in the software TAB and can be mailed to the E-mail ID programmed in the Software in PDF format.
Note :
1. For Generation of QR Code & sticker for missing or new addition can be provided on additional charges.
2. The software License is valid for 1 year only from the date of Supply and should be renewed on extra charges.
USER MANUAL GUIDE
Manual for RS232 Scale
1) AC POWER SUPPLY SPECIFICATION:- Requires 10 to 15 Volt transformer with 500mA to 1.5 A Rating.
2) DC POWER SUPPLY SPECIFICATION:- Requires 6V battery with 1A to 5A Rating.
3) TECHNICAL SPECIFICATION:- MCU:-Nuvoton based microcontroller with internal EEPROM IC and crystal for lower maintenance and higher life of the IC.
ADC:- The mother card uses latest AVIA technology based HX710, 24 bit delta sigma ADC for higher resolution, for better accuracy and better linearity. ADC is also has internal crystal so reduce the chance for crystal failure errors with found in last decade.
1.
Supply Voltage:– 230V AC, 50Hz +/- 10%
2.
Operating Temperature:– 0 Degree C to 45 Degree c.
3.
Humidity: 10% to 95% relative humanity (Non condensing).
4.
Power consumption: Max 10 watt.
5.
Hysteresis:- 0.03% of Rated capacity.
6.
Linearity:- 99.9% of the Rated capacity.
4) FEATURES:-
1.
The card has internal 16,000,000 Counts and 292,000 Display Count.
2.
Advance micro controller based technology.
3.
Auto power saver.
4.
The Full 6 Digits can be utilized with and without Dummy Zero.
5.
Card is also run if the initial count of the Load cell should be in negative (i.e. Minus zeroing).
6.
The best battery backup then the other card.
7.
18 Digits Alphanumeric NAME Setting.
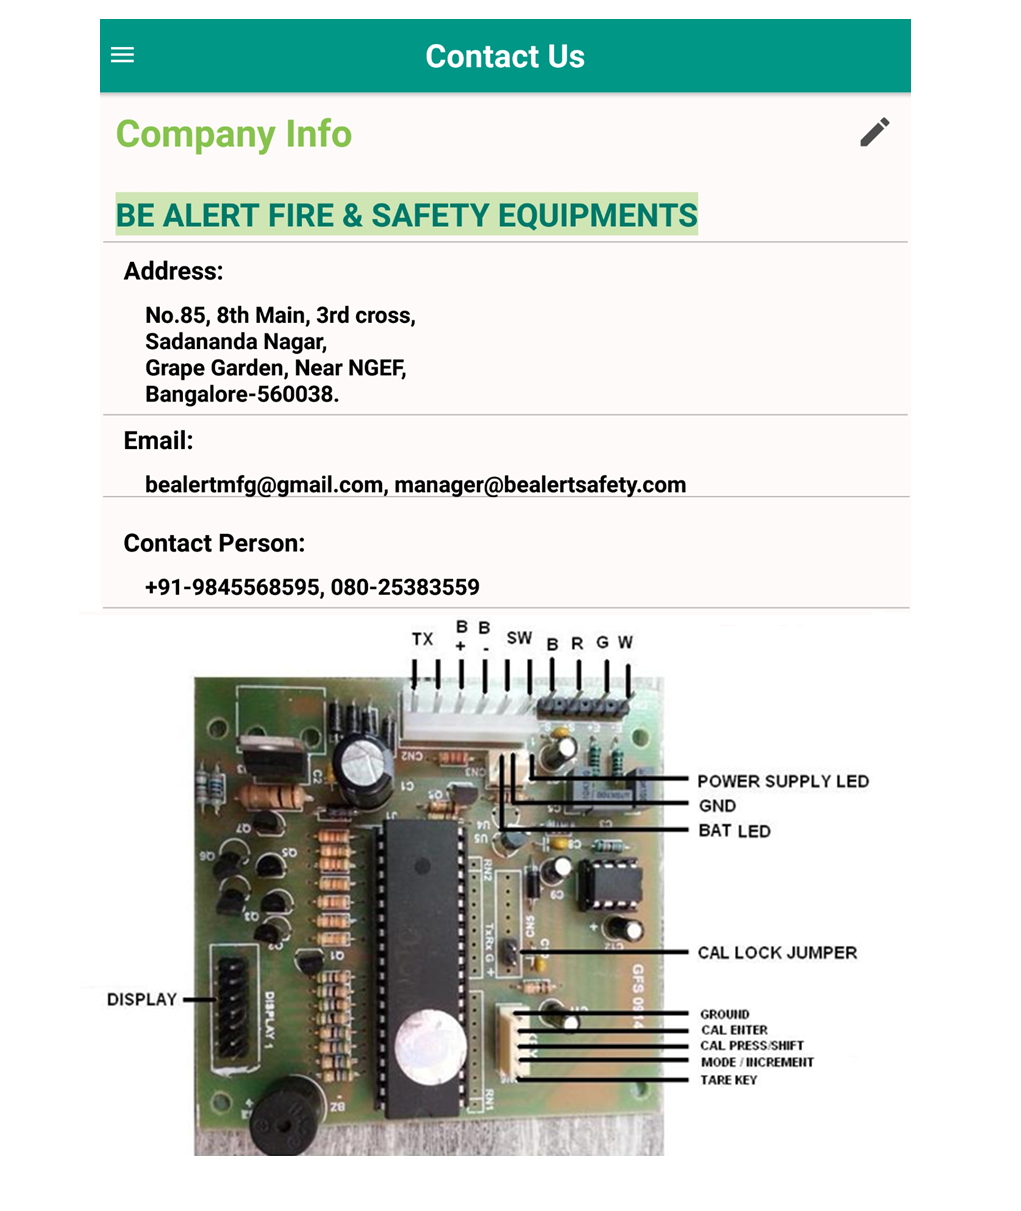
5) KEYS:-There are 4 keys function in the mother board.
Key 1:
Tare KEY / Enter
Key 2:
INCREMENT / Name SETTING
Key 3:
SHIFT / PARAM SETTING /CAL PRESS
Key 4:
COUNT / CAL ENTER
6) NAME SETTING :- Card can allow, to enter 18 Character alphanumeric names i.e. (A-Z, 0-9, BLANK)
Steps:
1.
1st Switch OFF the scale, then Press & hold KEY2 (MODE / INCREMENT) & switch ON the scale.
2.
Display shows “UNLOCK”, Now release KEY 2.
3.
Now press KEY1 (TARE), Display will blank for password entry. Enter UNLOCK PASS “2900” with the help of KEY2 (MODE / INCREMENT) and KEY3 (CAL PRESS / SHIFT) and then press tare key.
4.
Display -shows “CHPASS” then press tare key, then enter PARAMETER LOCK PASS “CUSTOME” (IF NEEDED) with the help of KEY2 (MODE / INCREMENT) and KEY3 (CAL PRESS / SHIFT) and then press tare key.
5.
Display shows “NAME1”, now press the tare key.
6.
Now display shows old name, enter new names first 6 ALPHA NUMERIC CHARACTERS with the help of KEY2 (MODE / INCREMENT) and KEY3 (CAL PRESS / SHIFT), then Press KEY1 (TARE) key to save the name. and for next 6 digit alphanumeric name.
7.
Now Repeat the steps 5 and step 6 for NAME 2 & NAME 3 settings.
8.
Press KEY1 (TARE) key to save the name.
7) PARAMETER SETTINGS :-
Steps:
1.
1st Switch OFF the Scale, then Press & hold KEY3 (CAL PRESS / SHIFT) & switch on the scale.
2.
Display shows “PASS”. Now release KEY 3 & press KEY1 (TARE), then enter PARAMETER LOCK PASS “CUSTOM” (Set in Name setting) with the help of KEY2 (MODE / INCREMENT) and KEY3 (CAL PRESS / SHIFT) then press tare key. If password is wrong display shows pass then Re-enter correct password.
3.
Display shows “PARMTR”. Now press the KEY1 (TARE). Display shows CS i.e. capacity selection.
4.
Now select capacity as per requirement using KEY2 (MODE / INCREMENT) (CS=1 for capacity 1, CS=2 for capacity 2 & CS=3 for capacity 3) then Press KEY1 (TARE).
5.
Display shows “CAP1”, then press KEY1 (TARE).
6.
Display shows last stored capacity 1, enter new capacity with the help of KEY2 (MODE / INCREMENT) and KEY3 (CAL PRESS / SHIFT) then press KEY1 (TARE) to store new capacity.
7.
Display shows “ACC1” it shows old, for entering new value, increment the accuracy by KEY2 (MODE / INCREMENT) and Press KEY1 (TARE),
8.
Display shows “DP1” it shows old, for entering new value, increment the dp segment by KEY2 (MODE / INCREMENT) and Press KEY1 (TARE).
9.
Then repeat the steps 5, 6, 7 and step 8 for CAP2 & CAP3 settings with its Accuracy and dp settings. Press KEY1 (TARE). Display shows,
10. AUTO ZERO (A 0) SETTING:-
Increment the value of auto off / zero tracking value by KEY2 (MODE / INCREMENT) and Press KEY1 (TARE). Display shows,
11. DUMMY ZERO (D 2):-
Increment the DMY value by KEY2 (MODE / INCREMENT) to activate dummy zero and press KEY1 (TARE). Display shows,
12. MODE SETTINGS:-
This mode is used for different mode of the weighing, which includes following different types of the weighing, To select different mode select as per given below,
Select 0 = To weighing/work in normal i.e. in grams or in kgs.
Select 1 = To weighing/work in Piece counting
Select 2 = To weighing/work in liter
Press KEY1 (TARE). Display shows,
13. DSP SETTING:- This mode is for saving electricity or power. If the all six digit will glow in standby mode the electricity consumption is more. To save the electricity only single digit will glow in standby mode by selecting the,
Select 0 = For full (Related to dp) digit glow.
Select 1 = For single digit glow (To save electricity). Single zero on screen
Select 2 = For only running dp (Decimal Point) glow (To save more electricity)
14. CONT (Continue) SETTING :- This function is mainly for data sending in PC or computer through RS232,
Select 0 for Manual data sending and 1 for Continue data sending into pc.
8) DISPLAY INTERNAL COUNT:- For displaying internal ADC count. Switch ON SCALE by pressing KEY4 (CAL ENTER/ COUNT). Release the KEY display show internal ADC COUNTS.
To exits from counts press KEY2 (MODE /INCREMENT).
9) CALIBRATION:-Calibration can be done in weighing mode,
NOTE: Please short the jumper for calibration, once done remove jumper so no calibration can be done.
Steps:
1.
First On/Start the weighing scale. Press KEY1 (TARE) for TARING the weight.
2.
Put the standard weight on the scale, weight should be 1/3rd of the Full capacity.
3.
Then press & hold KEY3 (CAL PRESS / SHIFT) & press once KEY4 (CAL ENTER / COUNT). Display shows “PASS”. Enter the parameter lock password with the help of KEY2 (MODE / INCREMENT) and KEY3 (CAL PRESS / SHIFT) then press KEY1 (TARE).
4.
Display shows “CAL” Press KEY1 (TARE). Then display show the count changed. Then display shows “000000”.
5.
Now enter the weight by incrementing KEY2 (MODE / INCREMENT) and KEY3 (CAL PRESS / SHIFT) for Shifting.
(E.g. If putted standard weight is 2Kg, to enter 2000. when display shows 000000 Then press KEY2 (MODE / INCREMENT) key two times so that display shows “000002” now press KEY3 (CAL PRESS / SHIFT), 3 times so the display shows “002000”).
6.
Now Press KEY1 (TARE) key. Calibration is successfully done
10) CHANGE IN WEIGHING MODE:- If selected weighing mode is different than normal gram mode in parameter setting, then to change between selected mode and weighing mode press KEY2 (MODE / INCREMENT).
11) ENTER LITER VALUE:- To enter the liter value first set the liter mode and toggle weighing mode. In liter mode display shows “L”. Now at this time PRESS KEY3 (CAL PRESS/SHIFT) for 10 seconds displays shows “SETLTR” and then “000000”. Now enter liter value per Kg. with the help of KEY2 (MODE / INCREMENT) and KEY3 (CAL PRESS / SHIFT). And press KEY1 (TARE). To store liter value, now display shows liters per value.
(NOTE:- Feed Liter value only for 1 liter)
12) ENTER COUNT VALUE:- To enter the piece value first set the piece counting mode and toggle weighing mode. In piece counting display shows “P”. Now press KEY1 for TARE.
Now Put counted Pieces on scale pan then PRESS KEY3 (CAL PRESS/SHIFT) key for 10 seconds displays shows “SETPCS” and then “000000”.
Now enter number of pieces putted on scale with the help of KEY2 (MODE / INCREMENT) and KEY3 (CAL PRESS / SHIFT). And press KEY1 (TARE), To store piece counting value now display shows no of pieces you entered.
(NOTE:- Put minimum 100 pieces on pan for better Result)
TO send RS232 Data: Press KEY 4 (CAL ENT) to send RS 232 Data.
COM PORT Settings for RS232
Baud rate :- 9600
Data Bits :- 8
Parity :- NONE
Stop bit :- 1
Flow Control :- NONE.